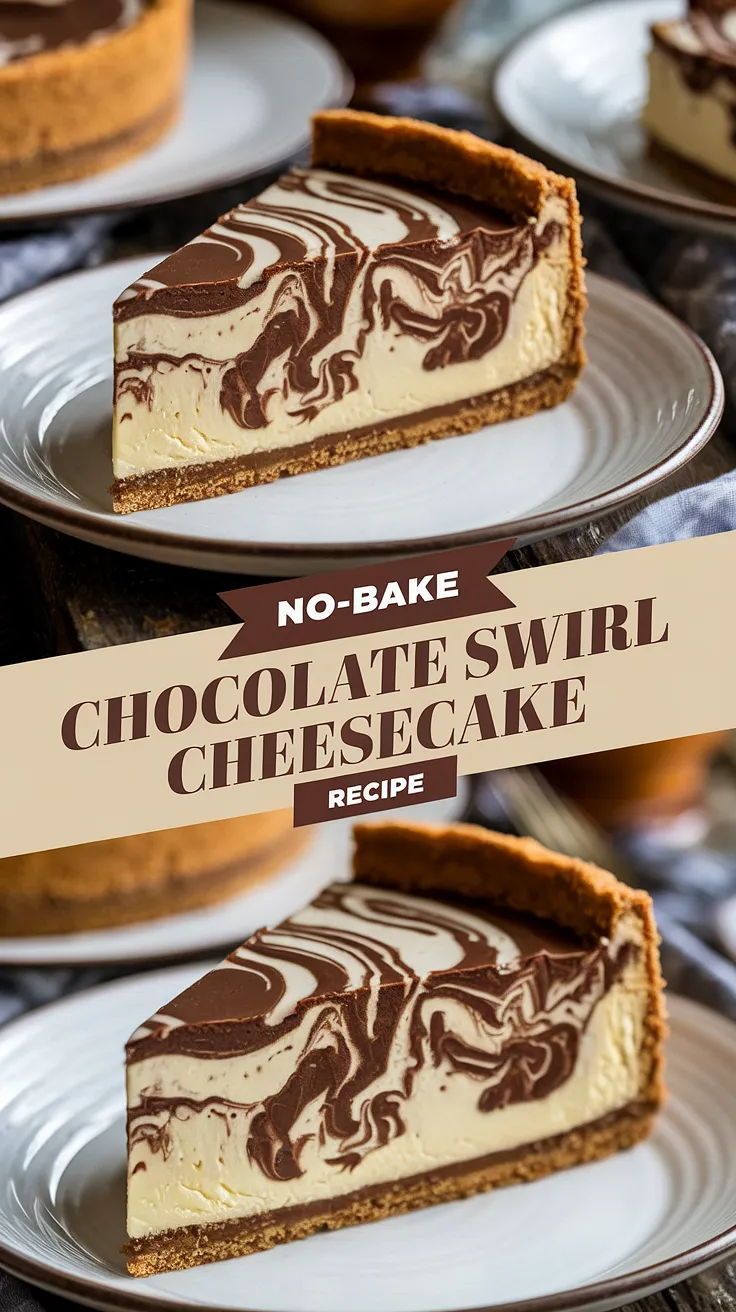
No-Bake Chocolate Cheesecake with Oreo Crust
A luscious, smooth chocolate cheesecake that requires no baking, set atop a crunchy Oreo cookie crust, perfect for an easy indulgent dessert. This american-inspired desserts ready in about 30 minutes layers cookies Oreo cookies, unsalted butter, melted, cream cheese, softened into a dessert worth slowing down for — great for weekend baking, holiday tables, or any time you want a sweet payoff at the end of a meal. Each serving lands at about 350 calories and feeds 12, so it slots into a weekend bake or a special-occasion dessert tray. Tap "Plan a meal with the AI" below to drop this recipe into your week and send the ingredients straight to Instacart. Nutrition values are approximate, calculated from USDA FoodData Central (fdc.nal.usda.gov) — verify against ingredient labels for any health-driven dietary plan.
Ingredients
- 24 cookies Oreo cookies
- 6 tbsp unsalted butter, melted
- 16 oz cream cheese, softened
- 3/4 cup granulated sugar
- 1 cup heavy cream
- 1/2 cup unsweetened cocoa powder
- 1 tsp vanilla extract
- 6 oz semi-sweet chocolate chips
- optional whipped cream, for garnish
Instructions
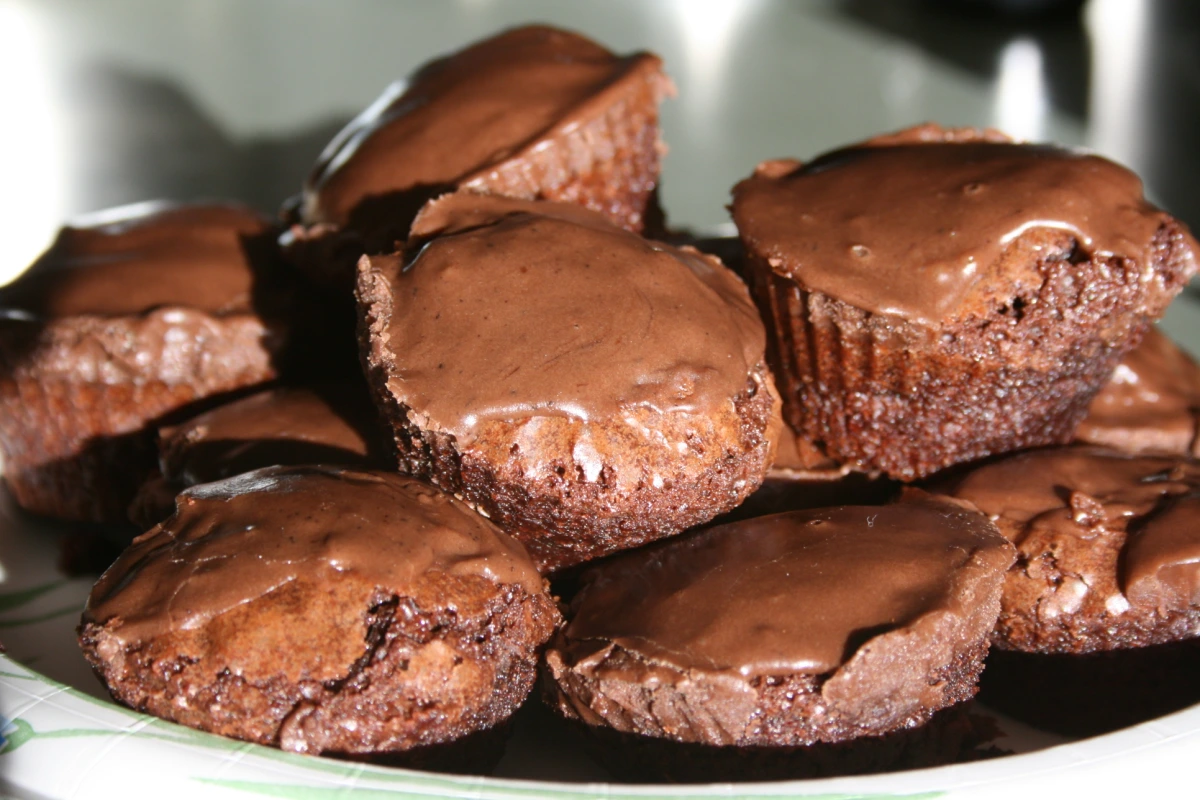
- Step 1: Preheat your oven to 350°F. Place 24 Oreo cookies in a food processor and pulse until finely ground. Transfer crumbs to a bowl and mix with 6 tbsp melted unsalted butter until evenly coated. Press this mixture firmly into the bottom of a 9-inch springform pan to form an even crust and bake for 10 minutes; remove and let cool.
- Step 2: In a large mixing bowl, beat 16 oz softened cream cheese with 3/4 cup granulated sugar until smooth and creamy, about 2-3 minutes using an electric mixer on medium speed.
- Step 3: In a small saucepan over low heat, warm 1 cup heavy cream and 6 oz semi-sweet chocolate chips, stirring constantly until the chocolate melts and the mixture is smooth. Remove from heat and whisk in 1/2 cup unsweetened cocoa powder and 1 tsp vanilla extract until fully incorporated.
- Step 4: Slowly pour the chocolate mixture into the cream cheese batter while mixing on low speed, blending until smooth and uniform.
- Step 5: Pour the cheesecake filling over the cooled Oreo crust, smoothing the top with a spatula. Refrigerate for at least 6 hours or overnight until set.
- Step 6: Before serving, optionally garnish with dollops of whipped cream. Slice and enjoy this rich, no-bake chocolate cheesecake.
Frequently asked questions
How long does No-Bake Chocolate Cheesecake with Oreo Crust take to make?
Total time is about 30 minutes (20 min prep + 10 min cook). Most home bakers find this fits a weekend afternoon; chill or store as the recipe directs before serving.
How do I store leftover No-Bake Chocolate Cheesecake with Oreo Crust?
Cool fully before storing. Most baked desserts keep at room temperature in an airtight container for 2–3 days, or in the fridge for up to 5 days. Cream- or custard-based desserts must go in the fridge within 2 hours; reheat gently or serve cold per the recipe.
Can I substitute ingredients in No-Bake Chocolate Cheesecake with Oreo Crust?
Yes — most ingredients in this recipe have flexible swaps. For oil, use any neutral high-smoke-point oil (avocado, grapeseed, refined coconut). For aromatics, dried herbs at ⅓ the volume of fresh work in a pinch. The full ingredient list is shoppable on Instacart so you can see substitutes in real time.
How do I scale No-Bake Chocolate Cheesecake with Oreo Crust for a different number of people?
The recipe is written for 12 servings. Multiply each ingredient by (your serving target / 12). Cook time stays roughly the same up to 2x; for 3-4x batches, switch from a skillet to a sheet pan or stockpot so the food isn't crowded — overcrowding steams instead of browns.
What goes well with No-Bake Chocolate Cheesecake with Oreo Crust?
American desserts like this pair well with a simple grain (rice, couscous, or crusty bread), a quick salad with acid (lemon vinaigrette, pickled onions), and a pan sauce or yogurt-based dip. Tap "Plan a meal with the AI" to get specific side suggestions.
Related recipes


Equipment for this recipe
Top-rated tools to make this recipe successfully.